Recently, someone asked me how to set up a local Wamp server on their computer so they can test WordPress sites locally before uploading and editing online. MakeUseOf nicely explained what a Wamp server is and how to set it up. I wanted to expand their explanation to include setting up WordPress.
What is this Wamp business?
According to MakeUseOf, WAMP stands for Windows Apache, MySQL and PHP.
A great majority of websites are run by a trio of services – Apache, MySQL and PHP. Apache is the web server, which handles browser requests and sends the information across the internet to your browser. PHP is the programming language that many sites are written in – this creates dynamic content which in turn is sent to Apache, which sends the data to your browser. And finally, MySQL is the database which stores the information for programs. PHP is used to access this database.
How to Set up a Wamp Server
Step 1
Download the WampServer.
Step 2
Run the installer, using the default options provided.
Step 3
Double click the Wamp icon on your desktop .![]()
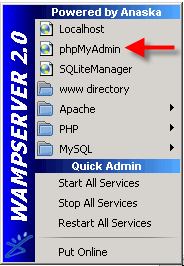
On your taskbar, near the time in the bottom right corner of your desktop, left click on the ![]() semicircle button and Click “Put online”.
semicircle button and Click “Put online”.
How to set up WordPress on your Wamp
Step 1
Download WordPress. Extract the files.
Left click on the ![]() semicircle on your taskbar.
semicircle on your taskbar.
Open up the www directory.

Drag the WordPress folder into the www directory.
Step 2
1. Open PHPmyadmin from your wamp menu

2. Create a new Database (‘wordpress‘ or ‘blog‘ are good). Leave Collation. Click Create.
![]()
3. Click the Home icon in the upper left to return to the main page, then click Privileges. If a user relating to WordPress does not already exist in the list of users, create one:
- Click Add a new User.
- Chose a username for WordPress (‘admin’ is good) and enter it in the User name field. (Be sure Use text field: is selected from the dropdown.)
- For Host, select Local and type in localhost
- Choose a difficult-to-guess password and enter it in the Password field. (Be sure Use text field: is selected from the dropdown.) Re-enter the password in the Re-type field.
- Write down the username and password you chose.
- Leave all options under Global privileges at their defaults.
- Click Go.
4. Return to the Privileges screen and click the Check privileges icon on the user you’ve just created for WordPress. In the Database-specific privileges section, select the database you’ve just created for WordPress under the Add privileges to the following database dropdown. The page will refresh with privileges for that database. Click Check All to select all privileges, and click Go.
5. On the resulting page, make note of the host name listed after Server: at the top of the page. (This will usually be localhost.)
6. Returning to where you extracted the WordPress package, rename the file wp-config-sample.php to wp-config.php.
7. Open the renamed wp-config.php file in your favorite text editor. Here’s a screenshot of how the wp-config.php is set up. 
8. Fill in the following information
DB_NAME
The name of the database you created for WordPress. (ex. WordPress)
DB_USER
The username you created for WordPress (ex. admin)
DB_PASSWORD
The password you chose for the WordPress username.
DB_HOST
The hostname you determined (usually localhost)
9. Save the file.
10. Run the install scrip by copying and pasting this URL into your browser http://localhost/wordpress/wp-admin/install.php
Step 3
Hooray! Hopefully all went according to plan.
Treat yourself to a nice cold beer.

